A tile leveler is a tool used to ensure that tiles are laid flat. Here are the steps to use a tile leveling tool:
1. Preparation: Before starting to lay ceramic tiles, make sure the floor or wall is clean, flat, and dust-free. If desired, cement mortar or tile adhesive can be used for base treatment.
2. Lay tile: Place the tile at the predetermined position and tap it gently with a rubber mallet to make it firmly bonded to the base layer.
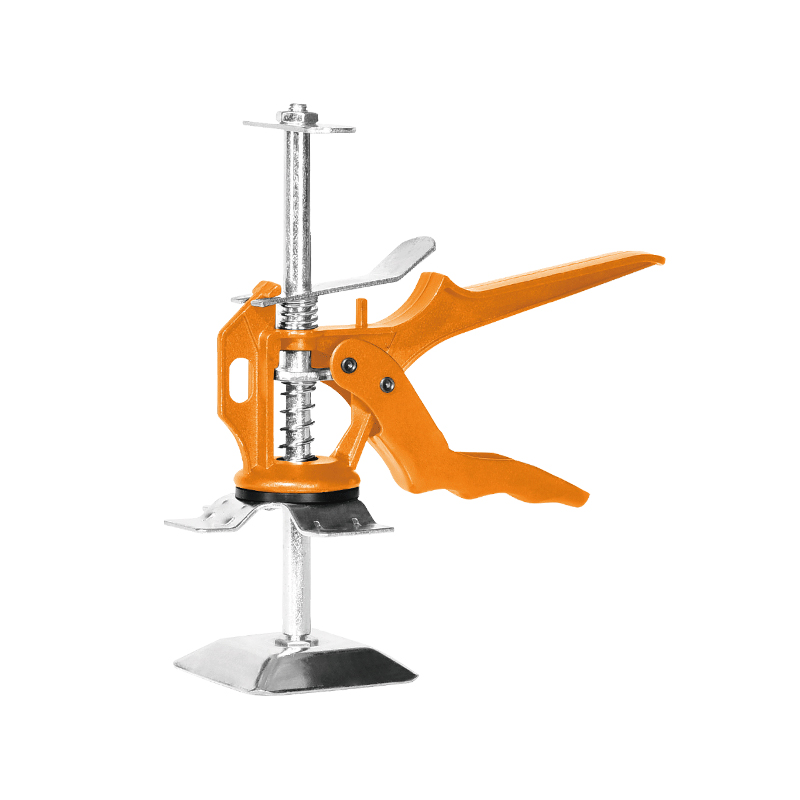
3. Use the leveling tool: Place one end of the leveling tool on the laid tile and the other end on the adjacent tile to be laid. Make sure the leveling tool is perpendicular to the tile surface.
4. Adjust the position of the tiles: By adjusting the position of the tiles to be laid, keep both ends of the leveling tool level with the surface of the tiles. This ensures that the gaps between the tiles are even and flush with the already laid tiles.
5. Repeat: Continue laying the next tile and use the leveling tool to make adjustments until the entire area is tiled.
6. Check the flatness: During the entire laying process, regularly use leveling tools to check the flatness of the tiles to ensure that there is no unevenness.
7. Fill the gaps: After the tiles are laid, use tile grout to fill the gaps between the tiles. Before caulking, make sure the tile surface is clean and free of dust.
8. Clean tiles: Use a damp cloth or sponge to gently wipe the tile surface to remove excess grout and stains. After the grout has dried, clean again to keep the tile surface clean.
9. Maintenance: Clean the ceramic tile surface regularly and avoid using hard brushes or abrasives to avoid damaging the ceramic tile surface.
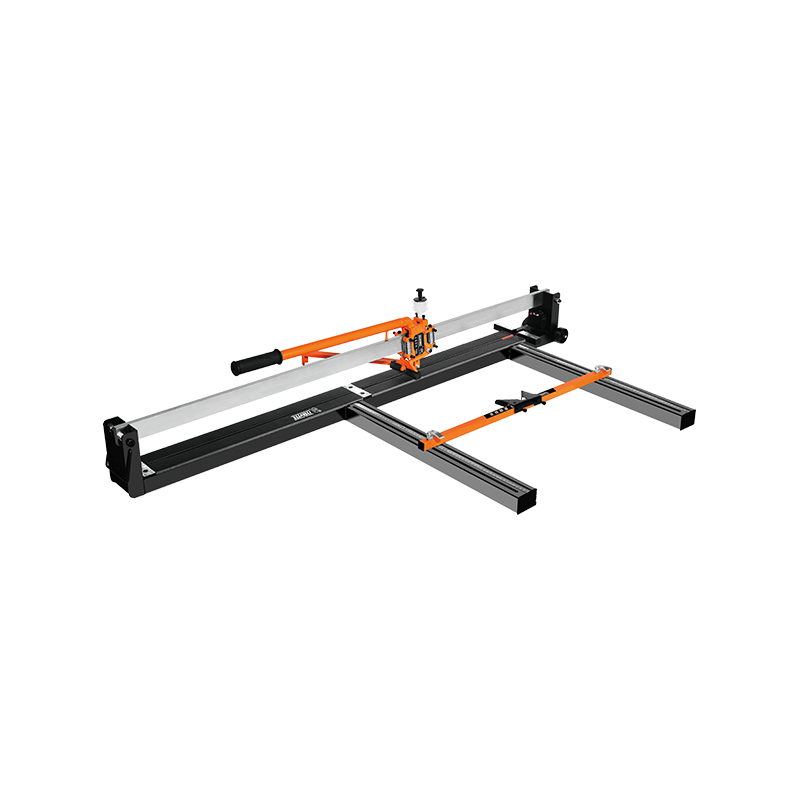
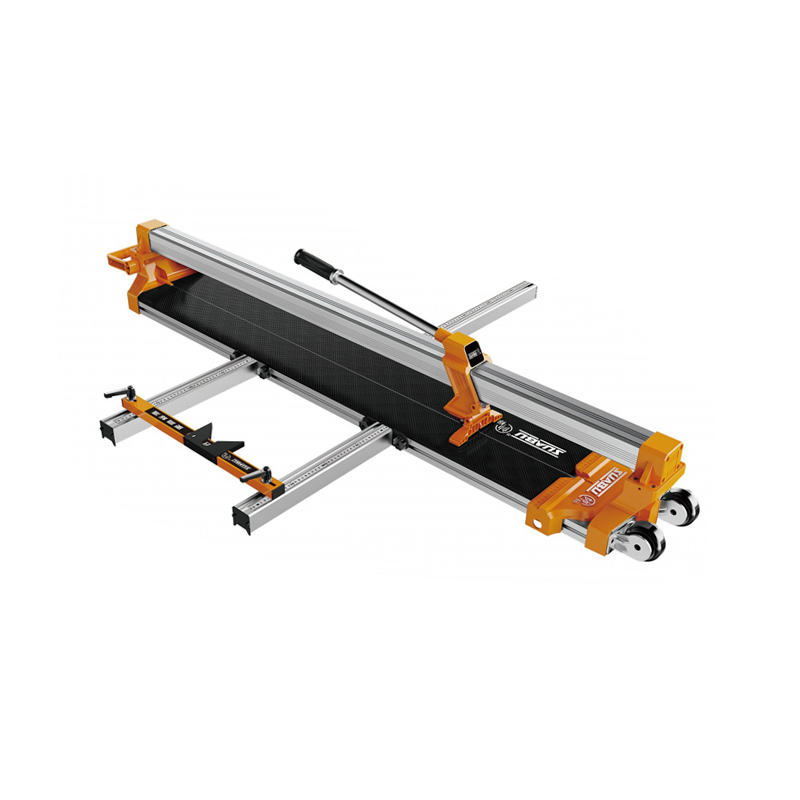
10. Tile Cutting: As you progress with laying tiles, you'll inevitably encounter areas where full tiles don't fit, such as edges, corners, or around obstacles like pipes. This is where tile cutting power tools come in handy. Tools such as a wet saw, tile cutter, or angle grinder can be used to make precise cuts. Measure the area where the tile needs to be fitted, mark the tile accordingly, and use the cutting tool to achieve the desired shape and size. Ensure that the cutting blade is appropriate for the type of tile you are using to avoid chipping or breaking.
11. Safety Measures: When using tile cutting power tools, always wear appropriate safety gear, including safety goggles, gloves, and a dust mask to protect yourself from sharp edges, dust, and debris. Make sure to follow the manufacturer's instructions for each tool to avoid accidents.
12. Dry Fit Tiles: Before applying adhesive, dry fit the tiles in their respective positions to confirm that the cuts are accurate and the layout is satisfactory. This step allows you to make any necessary adjustments without the pressure of drying adhesive.
13. Apply Adhesive and Set Cut Tiles: Once you are satisfied with the dry fit, apply adhesive to the substrate and set the cut tiles in place. Press firmly to ensure good adhesion. Use spacers to maintain even gaps between the tiles and the adjacent ones. Repeat the leveling process to ensure that the cut tiles are flush with the surrounding tiles.
14. Allow Adhesive to Cure: After laying all the tiles, allow the adhesive to cure according to the manufacturer's recommendations. This usually involves leaving the area undisturbed for a specified period, typically 24 hours. Avoid walking on the newly laid tiles during this time to prevent shifting or misalignment.
15. Grout the Joints: Once the adhesive has cured, proceed to grout the joints. Mix the grout according to the instructions and apply it using a grout float, ensuring it penetrates all the gaps. Wipe away excess grout with a damp sponge, taking care not to remove grout from the joints.
16. Final Clean and Polish: After the grout has been set, perform a final cleaning of the tile surface. Use a clean, damp cloth to remove any remaining grout haze. For a polished finish, you can use a specialized tile cleaner or polish designed for the type of tiles you have installed.
17. Seal the Grout (Optional): Depending on the type of grout used, it may be beneficial to apply a grout sealer to protect against moisture and staining. Follow the sealer's instructions for application and drying times.
18. Inspect and Touch Up: Finally, inspect the entire tiled area for any imitations or areas that may need touch-ups. This includes checking for uneven tiles, ensuring all grout lines are filled properly, and addressing any residual adhesive or grout marks.
By following these steps, you can achieve a smooth, professional-looking tile installation. Patience and attention to detail are key throughout the process, especially when using tile cutting power tools and ensuring all tiles are properly leveled and aligned. Regular maintenance, such as cleaning and sealing, will help preserve the appearance and longevity of your tiled surface.